Packing the Pump Correctly:
The importance of packing the pump correctly cannot be overemphasized. Many packing failures are due to the incorrect installation of the packing. The following steps have been devised to ensure effective installation of packings on pumps.
1. Remove all the old packing from the stuffing box.
Clean box and shaft thoroughly and examine shaft sleeve for wear and scoring. Replace shaft sleeve in wear is excessive.
2. Choosing the correct cross-section of packing.
To determine the correct ring size:
A. Measure the diameter of the shaft (inside the stuffing box area, if possible.)
B. Measure the diameter of the stuffing box (to give the O.D. of the ring.)
C. Subtract the I.D. measurement from the O.D., measure and divide by two. The result is the required cross section.
3. Cutting packing into rings.
Figure 1: Hold the packing tightly on the mandrel, but do not stretch excessively, and cut the ring(s).

Figure 2: Multiple rings can be Butt Cut / 90°

Figure 3: Individual rings can be Skive Cut / 45°

The best way to cut packing rings is to cut them on the mandrel with the same diameter as the shaft in the stuffing box. If there is no wear, rings can be cut on the shaft outside the stuffing box.
Insert one ring at a time into the stuffing box, making certain it fits the packing space properly. Each additional ring can be cut in the same manner, or the first ring can be used as a master from which the balance of the rings are cut.
If the Butt Cut rings are cut on a flat surface, be certain that the side of the master rings, and not the I.D. or O.D. surface, is laid on the rings to be cut. This is necessary so that the end rings can be reproduced.
When cutting Skive, diagonal joints, use a maple miter board so that each successive ring can be cut at the correct angle.
It is necessary that rings be cut to the correct size. Otherwise, service life is reduced.
4. Install one ring at a time. Make sure the packing ring is clean and has not picked up any dirt in handling. If needed, lubricate the shaft and inside of the stuffing box.
Packing rings should be firmly seated in the stuffing box one at a time using a tamping tool.
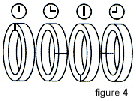
Figure 4: Joints of successive packing should be staggered at 90°

5. After the last ring is installed. Put the gland in place and take up bolts finger tight or very slightly snugged up. Do not jam packing into place with excessive gland loading. Start the pump and take up bolts until leakage is decreased to a tolerable minimum. Make sure gland bolts are adjusted evenly. Stopping leaking entirely at this point will cause the packing to burn up.
6. Allow packing to leak freely when starting up a newly packed pump. Excessive leakage during the first hour of operation will result in a better packing job over a longer period of time. Take up gland bolts gradually as the packing seats to a tolerable level of 10 to 12 drops per minute per inch of shaft diameter. Never try to stop leakage entirely, unless packing manufacturer indicated that it is safe to do so.
7. When specified by the pump manufacturer, provide means of lubricating the shaft and the packing through the lantern ring by supplying water, oil, grease or liquid handled in the pump. Fittings for this purpose are standard on many pumps.
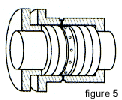
8. If the stuffing box has a lantern ring , make sure that the lantern ring, as installed, is slightly behind the fluid inlet so that it will move under the inlet as the follower pressure is applied.See Figure 5

9. On both centrifugal and reciprocating pumps, about 70% of wear is on the outer two packing rings nearest the gland. However, each additional ring does throttle some fluid pressure. On most equipment, there must be enough rings so if one fails, another does the sealing, and the machine need not be shut down.
